
Hey, there, Duelyrs! It’s Arananthi back again with 3 more Pauper decks — 440 Spirit each, for Abyssian, Magmar, and Vanar players. Enjoy!
The Theory Behind This Deck
In general, in card games, there are four archetypes of deck: Control decks, Aggro decks, Combo decks, and Tempo decks. Aggro decks have the goal of reducing your life total to zero as quickly as possible. Control decks have the goal of forcing you into a topdecking situation while they still have a hand full of options. Tempo decks have the goal of owning the playing field. And Combo decks have the goal of delaying their own death until they can finish you off with a nigh-unto-unstoppable play. It’s generally accepted that Combo beats Control beats Tempo beats Aggro beats Combo, with matches between Combo-Tempo and Control-Aggro being determined by the specific decks rather than archetypal weaknesses.
So what then is a ‘midrange’ deck? Well…it’s a deck that sits in the middle. Midrange decks focus on flexibility: they can move quickly and capitalize on an opponent’s weak start or early mistake like an aggro deck, or they can play the tempo game and win by playing a big, on-curve threat every turn, or they can play a strong controlly game, retreating and hiding behind a wall of meat while they rustle up the tools for a lethal blow.
This deck is quite deliberately built to allow you to play super-efficient high-stat threats every turn, turn after turn, forcing your opponents to come up with more and more answers until they run out and have to answer with their lives.
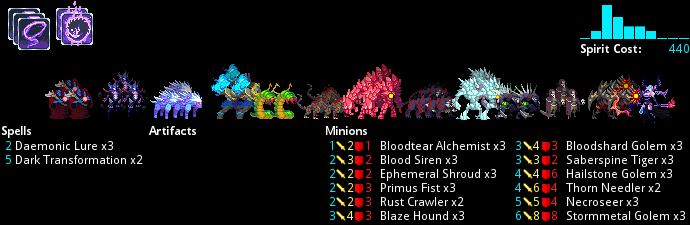
- 2 mana: Blood Siren, Primus Fist, Rust Crawler
- 3 mana: Bloodshard Golem, Blaze Hound
- 4 mana: Thorn Needler, Hailstone Golem
- 6 mana: Stormmetal Golem
But, the deck also packs a number of cheap tempo-building cards like Daemonic Lure, Bloodtear Alchemist, Saberspine Tiger, and Ephemeral Shroud that can undo a lot of your opponent’s effort for only a little of your own. Heck, Rust Crawler and Blood Siren are both high-stat and potential big tempo gains.
This allows you to play to your opponent’s weaknesses: the moment they over-invest in a single tool (say they grab a Mana Spring and plant an Ironcliffe Guardian on turn 2), you play a solid threat on the remaining Mana Spring (Blaze Hound), and then counter their 5-mana investment with a 2-mana investment (Daemonic Lure). Now they have to face off against a beast that can do 8 face damage if left alone, and their 5 mana is dinking off 3 full turns away in the corner, and your next turn is going to bring more big threats down.
Midrange decks are complex to play, because they involve continually assessing what your opponent is likely to be capable of, and trying to choose threats that most effectively prevent those plays. For example, you generally want to choose Thorn Needler against Songhai and Vetruvian, because they have just about as much difficulty removing the Needler as they would a Hailstone Golem, but the Needler is a more critical threat (Songhai because General health is a big resource for them, Vet because of Obelysk health). Against Lyonar (Holy Immolation), Magmar (Makantor Warbeat), and Vanar (Cryogenesis), Hailstone Golem is stronger. (Abyssian is a wash.)
If you memorize the Big List of Geography-Based Spells, it’ll help a lot in playing this deck.
In general, though, your goal is to play big, on-curve threats, and once you get one to stick, use your cheap toolset to make it count. You’ll be surprised once you get started just how much foresight it can take — but I can tell you that this is the Pauper with the best win percentage (around Rank 15) that I’ve tested so far. (I’m 8 for 10.)
That said, every deck has its weakness, and this decks weakness is hard removal. Nothing sucks worse than slapping down a 4/6 on turn 2 going first, laughing maniacally, and then having it get Martyrdomed and gaining no life because you’re already at 25. Or working the Mana Springs perfectly and nailing that third-turn Stormmetal Golem just to get Hailstone Prisoned and have to wait 2 more turns to play it again. Fortunately, this deck should be able to bulldoze past it and lay down another, even bigger threat next turn in most instances, so it’s not game-ending…just a major setback.
Preferred General: Lilithe Blightchaser. While there is a strong argument to be made for Cass’ 1-damage ping as a valuable tempo tool, Lilithe’s ability to add bodies to the board makes for a of opportunities to harass the enemy in clever and useful ways. Cut off escape routes, delay the re-entry of a Lured fattie back into the battle, land a surprise finisher on an important minion with Primus Fist on a Wraithling, and of course there’s always the time-honored technique of just wearing your opponent down with one-damage slaps while you hide behind a Stormmetal Golem and two Blaze Hounds.
Mulligans: It doesn’t matter who the opponent is, you always want to aim for a solid curve for the first three turns. Aim for a 2-3-4 if you’re going first, and a 3-4-5 or 2-2-4-5 or 3-4-2+3 going second. But along the way, also look for one or more of the following early-game tools to use against each faction’s most common openers:
- Lyonar: Daemonic Lure to break Zeal, or Blood Siren to counteract its effects so that your Blaze Hound doesn’t die to the Windblade Adept it kills.
- Songhai: Bloodtear Alchemist to deal with Heartseeker/Mini-Jax (esp. vs. Reva), Ephemeral Shroud to take off Killing Edge and remove Backstab (esp. vs. Kaleos).
- Vetruvian: Bloodtear Alchemist to deal with Pyromancer, either Ephemeral Shroud or Daemonic Lure to deal with Obelysks.
- Abyssian: Ephemeral Shroud for Shadow Walkers, Rust Crawler for Spectral Blades/Horns of the Forsaken.
- Magmar: Primus Fist to allow a smaller minion to trade up into their bigger ones, Bloodtear Alchemist to remove an Egg while still developing your board.
- Vanar: Daemonic Lure to get Infiltrate creatures out of Infiltrate positioning, Ephemeral Shroud because just about every creature they put down has some sort of dispellable annoying effect. Start Replacing for Dark Transformation around turn 3 because it’s the best way in the game to deal with Draugar Lord.
Early Game (Turns 1-3)
Ideally, you’ll land, in order, a 2/3, a 3/4, and a 4/6 on turns 1, 2, and 3 (going first). This should put you in a pretty clear position to dominate the board. If the opponent posts a threat too big to ignore — as in, it can kill your largest minion without risking death (most often a Ranged or Blast dude with buffs) — skip the curve and play whatever tool you need to remove the risk alongside a spare smaller dude. Your creatures should essentially focus on killing their creatures, hitting face only if there’s not a solid board-control-improving move you can make.
Midgame (Turns 4-6)
If the gameplan is working, at some point in these turns you’ll reach a place where you have to choose between playing another huge threat or just not. There’s some strong arguments in favor of ‘not,’ primarily being that overcommitting to the board leaves you vulnerable to board clearing power moves. (I’ve gotten eaten by Flash Reincarnation –> Makantor –> Great Fortitude more than I care to admit.) So carefully consider your opponent’s faction and what they’ve played so far before you slap down that fourth huge beast — it may be wiser to keep it for after they’ve dealt with the current threat.
Late Game (Turns 7+)
Similarly, you’ll reach a point where you have to choose to keep fighting the board-control war, or switch to the face race. If you’re playing a control deck, you can and will lose the board control war if you try to play straight into their gameplan, so you have to kill them before the game reaches that point. Generally speaking, a combo deck is similar, except you won’t really notice their gameplan (it looks like ‘my deck sucks’) until it comes out of nowhere and kills you, so don’t dink around with opponents who seem weak, either. (I got utterly pwned by an extraordinary Twin Fang+Kujata+Dance of Dreams+1-cc/1-health minion deck that just started dropping craptons of free minions that died instantly to Kujata and powered up Twin Fang by dying…facepunched for 22 from the clear blue sky. Don’t let it happen to you!) The earlier you switch to face, the more opportunity you give your opponent to come back by fighting for board control, but the longer you wait, the more opportunity you give them to obtain an insurmountable card advantage. That’s why it’s called ‘midrange,’ guys. You win by playing to whichever situation your opponent’s deck seems less ready to take advantage of.
Swaps
Swaps for this deck are
- Swap Blaze Hound for Void Hunter if you’re worried about giving your opponent cards.
- Swap Bloodshard Golem for Healing Mystic and 2x Rust Crawler for 2x Sand Burrower to shift the deck into a more value-oriented early game.
- Swap 2x Thorn Needler for 2x Primus Shieldmaster if you’re getting aggroed (or possibly 3x Hailstone Golem for 3x Shieldmaster, if you prefer.)
- Swap 2x Thorn Needler for 2x Breath of the Unknown for a sometimes-vital bit of midgame tempo swing (heal your big-HP beasts and kill some weenies). (Requires 80 additional Spirit.)
Upgrades
This deck upgrades differently than most, because quite frankly there’s just few Rare/Epic minions that have the raw board power that the basic Golems do, so you have to wait a while to move on from the Golem horde.
- Necroseer –> Dancing Blades
- 2x Dark Transformation –> 2x Ritual Banishing
- 2x Thorn Needler –> 2x Lightbender
- 1x Ephemeral Shroud –> 1x Ritual Banishing
- Bloodshard Golem –> Spectral Blade
- Hailstone Golem –>Black Solus
- 2x Ephemeral Shroud –> 2x Spelljammer (This one is optional.)
- Stormmetal Golem –> Spectral Revenant
Once fully upgraded, this deck is easily Diamond-worthy, even without the Legendaries. Depending on the meta, it’s capable of making S-rank with a bit of time put in. Good luck!
The Theory Behind This Deck
Control decks in Duelyst have a bit more to them than they do in simpler games, because aggressive decks have more options — playing on a board means you can’t just put one big fat dude in the way and have him shieldmaiden you (unless he has Provoke and your back is against a wall, but even that’s pretty hard to maintain for any length of time.) That means your focus has to be on eliminating the opponent’s threats rather than keeping them at bay.
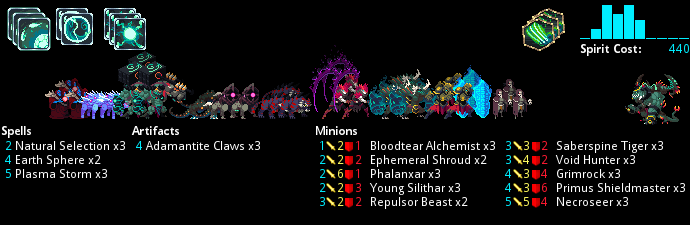
Much like a Value deck (see the Lyonar Pauper), a Control deck wants to win by ending up having more cards to play than the opponent does. That means they have to either play fewer cards or draw more cards during the early and midgames. The Value deck wants to do that by using single cards to eliminate two or more cards — the Control deck wants to do it by using one card to eliminate several of the opponent’s cards. In this case, those cards are Adamantite Claws, Plasma Storm, and possibly Grimrock, and indirectly (by combining it with Overload & Claws) with Earth Sphere. This particular Control deck also provides some clever double-purposing insofar as Claws and Grimrock can also be used as finishers, which is nice. (More often, though, Grimrock is how you draw out your opponent’s oh-sh*t cards in the midgame — drop it just outside their reach, wink, and try to make it look like you’re walling it off, and they’ll often go to some silly lengths to take it out.)
The playstyle Control rolls with is one of minimalism in the early game — you want to encourage your opponent to play out as many threats as possible as quickly as possible, so your board clears have maximum effect. That said, in this particular control deck, you don’t really want to leave creatures with less than 4 attack just sitting around, because they’ll screw up your opportunity to use Natural Selection on bigger targets and they’ll make Plasma Storm a harder decision to make.
Preferred General: Vaath the Immortal. Simply put, Vaath’s Overload allows him to make ever-more-efficient use of his face when it comes to removing the enemy’s threats — and ultimately, if the game reaches the late stages, he can make himself a lethal threat.
Mulligans
In general, you want to keep a Plasma Storm (just one), a Grimrock (just one), or any Young Silithars you get ahold of. In addition, you want to look for certain tools that you can use to efficiently get through the early game:
- Lyonar: Either Repulsor Beast or Ephemeral Shroud to deal with Silverguard Knight (don’t waste them on Windblade Adepts), Adamantite Claws for taking out Knights, Shieldmasters, Suntide Maidens, and so on.
- Songhai: Primus Shieldmaster to drop at your back to keep Backstabbers at bay, Ephemeral Shroud to disable fast-growing Chakri Avatars.
- Vetruvian: Bloodtear Alchemist to eliminate turn-1 Pyromancers, Repulsor Beasts or Ephemeral Shrouds to deal with various Obelysks.
- Abyssian: Gotta nail an Ephemeral Shroud for the Shadow Watchers and put extra emphasis on finding a Plasma Storm ASAP.
- Magmar: Definitely your hardest matchup; look for Adamantite Claws and Repulsor Beast to keep their big beasties at bay. Don’t ditch a Bloodtear Alchemist, though, just in case they bring a Phalanxar out to play.
- Vanar: Definitely your second-hardest matchup; try to keep Crystal Cloakers out of Infiltrate so that Plasma Storm will kill them, and seek out Phalanxar to either kill off those Infiltrates ASAP or bait out a Chromatic Cold/Cryogenesis so your later creatures won’t have to deal with it.
Early Game (Turns 1-3)
Play your first turn like normal (walk up 2, drop something), and watch the opponent carefully. If they’re playing something prone to dropping big early drops (Big Abyssian, anything Magmar, and most Songhai (using Killing Edge or just speedcasting with a Chakri Avatar out), you need to kind of get in their face and carefully use Adamantite Claws, Phalanxar, and Natural Selection to slow their roll. If it’s anything else, promptly back up and let them take the Mana Springs and use them to put out their threats.
Midgame (Turns 4-6)
Watch for the first opportunity to bring out your several-for-one cards to good effect, but try to make sure you land Overload when it’s available — it’ll save your butt in the long game. If there’s no clear opportunity to use Claws or Plasma Storm, drop your Void Hunters and Necroseers and try to keep their board presence minimized that way, and try to force a chance to drop Grimrock somewhere that he can grow. Generally speaking, Replace your Earth Spheres unless you get below about 15 HP (20 vs. Songhai or Kara-Vanar)
Late Game (Turns 7+)
As the game moves on, you should be Overloading every turn. If you draw your third Adamantite Claws, don’t play it — save it for a surprise bit of ‘burst,’ possibly alongside a Saberspine Tiger. Most games that last this long are pretty firmly in your favor, but watch out for late-game power drops like Aymara Healer from a Vetruvian or Silithar Elder from a Magmar. It might be in your best interest to keep an Ephemeral Shroud in your pocket for those moments, as well. Generally, though, your late game will consist of playing chess with them, keeping them close enough to threaten with your General’s huge claws but far enough away that you don’t get surrounded and beaten down.
Swaps
Potential swaps for this deck include:
- Grimrock –> Veteran Silithar (less oh-sh*t factor, but tougher – def. do this at rank 15+)
- 1x Phalanxar –> 1x Ephemeral Shroud (tough to say which is more critical more often)
- 1x Phalanxar –> 1x Earth Sphere (requires 40 add’l Spirit)
- 2x Earth Sphere –> 2x Silhouette Tracer (dangerous, but makes for surprise finishing punches)
- Void Hunter –> Dancing Blades
Upgrades
The upgrades make this deck even more capable of dealing with both single large threats and swarms of small-to-midsize threats.
- Phalanxar –> Jaxi
- Void Hunter –> Sojourner (Option #1: harder to use Plasma Storm, but better drawing)
- Void Hunter –> Chaos Elemental (Option #2: worse drawing, better board presence)
- Grimrock –> Egg Morph
- 2x Earth Sphere –> 2x Emerald Rejuvinator
- Necroseer –> Makantor Warbeast
- 2x Repulsor Beast –> 2x Silithar Elder
- Bloodtear Alchemist –> Vindicator
Even without the legendaries, this is easily a Gold-division deck when upgraded. With them, and with plenty of practice, this deck should take you to Diamond really sacrificing too much of your life to Duelyst. 🙂
The Theory Behind This Deck
‘Tempo’ is a term that essentially means ‘you’re the aggressor.’ Sun Tzu says (paraphrased), the aggressor decides when the fight occurs; the defender decides where the fight occurs. When you have the tempo in Duelyst, it means you’re the one deciding which minion gets attacked — range permitting. The ideal way to do that is to ensure that you’re the player whose minions have already been in play for a turn (and thus are able to attack), and your opponent’s minions die before they get out of summoning sickness. This deck is designed to put you in that driver’s seat.
The downside to tempo is that it will naturally swing back and forth over the course of a game, and generally speaking, in order to get it back once it’s swung to your opponent, you have to expend more resources in a single turn than your opponent does — some to get the opponent’s board clear, and some more to ensure that you have a minion left after your opponent’s board is clear. To that end, tempo decks can have a hard time dealing with control decks that seek to expand the card disadvantage that tempo decks innately tend to create for themselves.
The upside is that it’s often possible to kill a control deck before they can capitalize on their card advantage. 🙂
This deck relies on a number of tricks to keep tempo. First, it packs a hell of a lot of removal, and often that removal can eliminate more mana worth of enemy creatures than it costs. When you have 5 mana and you can use 3 of it to remove the enemy’s 5-cost Magi of the Four Winds/Shadowdancer/whatever and then 2 more to put down a Crystal Cloaker, you just made a strong tempo play.
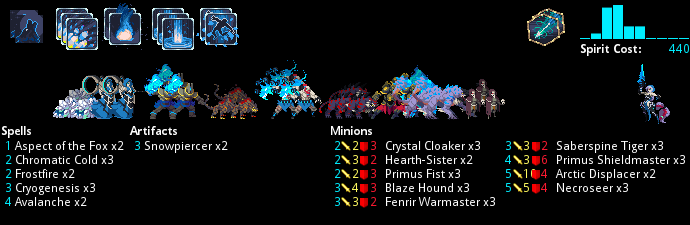
Second, Snowpiercer is a huge tempo-gaining tool, albeit at the cost of your face. Eliminating 2 or more 5-HP creatures with General swings and simultaneously putting down some decent threats of your own is what the tempo game is all about.
Third, the deck is pretty good at trading up — in other words, taking out a creature worth X mana using a creature the cost less than X mana. Crystal Cloaker (when Infiltrated), Blaze Hound, and Arctic Displacer are good at doing this just normally, and Frostfire and Aspect of the Fox both allow you to do this more powerfully but generally at a card disadvantage.
Mulligans
As you can probably guess, your first priority is nailing a good t1 play — gotta start strong on the board if you’re going to take the tempo right away. Saberspine Tiger doesn’t count as a t1 play going second; you want either 2x 2-drops, Blaze Hound, or Fenrir Warmaster. (Always mulligan away an Arctic Displacer and the second/third Crystal Cloaker; you’ll get them back from Cryogenesis.) After that, you want to focus on nailing the plays that are the most likely for your opponent’s faction to have problems with:
- Lyonar: Snowpiercer for Silverguard Knight, Primus Shieldmaster for Windblade Adept/Azurite Lion.
- Songhai: Fenrir Warmaster for surviving Phoenix Flame and taking out Assassins and Gore Horns, Chromatic Cold/Aspect of the Fox to remove flurries of buffs.
- Vetruvian: Cryogenesis/Chromatic Cold for eliminating Pyromancer and Obelysks (with General attack if using Cryogenesis), Primus Shieldmaster to keep those annoying Rush Dervishes off your back.
- Abyssian: Fenrir Warmaster/Primus Shieldmaster to circumnavigate Grasp of Agony, Chromatic Cold/Aspect of the Wolf/Cryogenesis to deal with Shadow Watcher, Bloodmoon Priestess, and Shadowdancer.
- Magmar: Snowpiercer for Veteran Silithar, Fenrir Warmaster for surviving getting attacked more effectively than Rebirth does.
- Vanar: Chromatic Cold/Cryogenesis for dealing with Glacial Elemental or Fenrir Warmaster, Hearth-Sister for pulling Infiltrate minions off of your half of the board.
Early Game (Turns 1-3)
Your ideal first moves are to try to push onto your opponent’s side of the field so you can bust out 4/3 minions for 2 mana, and to keep your opponent’s side of the field clean. Setting up blockages so that your opponent has to play into Faie’s Warbird BBS is beneficial if you can pull it off, but it’s not super-vital.
Midgame (Turns 4-6)
Look for opportunities to play a cantrip (Blaze Hound, Cryogenesis, Necroseer) without losing tempo — it’s important to keep your hand full so you don’t run out of plays before they run out of HP! Similarly, look for chances to use Aspect of the Fox and Frostfire to take out an enemy’s big threat without losing a minion of your own. The midgame is where tempo decks thrive, but you need to be careful not to overextend and play into a big value play like Holy Immolation, Makantor Warbeast, or Breath of the Unborn. If you start to feel like you’re unable to keep up, retreat onto your side and hit them with Avalanche when they chase you. (You can also use Arctic Displacer as a lure if they don’t seem to have a deck that could easily remove it with spells.)
Late Game (Turns 7+)
Your opponent should be getting a bit desperate as your BBS keeps whittling their HP away even as you maintain board dominance with your creatures and spells. Try to keep a Chromatic Cold or Aspect of the Fox at the ready to disable a desperation gambit killshot. In the end, your big finisher is playing Arctic Displacer out of their reach and then using Hearth-Sister to warp it in for the titanic facepunch. Bonus points if you can throw Frostfire on it as it comes in.
Swaps
- 2x Avalanche –> 1x Hearth-Sister & 1x Snowpiercer (requires 40 extra Spirit)
- 2x Arctic Displacer –> 2x Brightmoss Golem if the meta demands a more stable board presence
- 2x Frostfire –> 2x Healing Mystic if you’re going with the above (Frostfire too inconsistent)
- 1x Primus Fist –> 1x Hearth-Sister if the position-swapping is stronger than the trading-up
Upgrades
The upgrades to this deck shift it toward a setup that is remarkably hard to kill, utilizing all manner of creatures that just don’t die and adding some surprise burstdown.
- Necroseer –> Dancing Blades
- 2x Avalanche + 1x Arctic Displacer –> 3x Snow Chaser
- 1x Arctic Displacer + 1x Frostfire –> 2x Razorback
- 1x Frostfire + 1x Snowpiercer –> 2x Aspect of the Drake
- 1x Snowpiercer –> 1x Aspect of the Mountains
- 2x Aspect of the Fox –> 2x Jax Truesight
Fully upgraded, the win conditions you can get from Jax+Razorback or just using Aspects of the Drake and Mountains to turn innocent little Snowchasers into big beasts and either kill a bunch of enemy minions or send some big hairy minions of your own sailing across the board for a gang beatdown finisher will take you to Diamond with some work. Without the Legendaries, you should still be able to get Gold pretty handily.
…and that’s it for now! I’ll try to come back in a couple more weeks with a few more decks of a slightly higher cost, maybe 1500 or so, with similar guides for y’all. Until then, keep on Duelyng!
