
Alright, Duelyrs, this last big patch has made a lot of changes, but we adapt and move forward with glee! I’ve only had time so far to test and write up pauper decks for Lyonar, Songhai, and Vetruvian, but I wanted to get them out to you so that all y’all new players have an idea of what you can do and what you should shoot for. Let’s not dilly-dally — here’s the first deck:
The Theory Behind the Deck
Value in the game of Duelyst means card advantage, which you accrue every time a single one of your cards is able to perform any TWO (or more) of the following (can totally do the same one twice):
- Draw a card
- Destroy an enemy card
- Generate a body
- Requires 2 or more enemy cards to remove
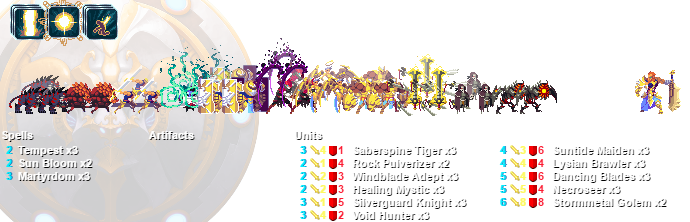
So for example Sojourner will nearly always draw two or more cards — instant card advantage. Necroseer draws a card and generates a body — instant card advantage. Dancing Blades destroys an enemy card and generates a body. Suntide Maiden can, conditionally, eliminate several enemy cards before she gets mobbed down. And so on.
(There are other concerns, realistically, like not consistently using a 5-mana card to clear a 2-drop and leave behind a body worth 1/3 of a mana (looking at you, Dark Transformation), but in general, counting card by card is more important, value-wise, than counting mana by mana because ultimately, the value deck wants to win by having more resources than the opponent .)
This deck is built around the idea of extracting maximum value from every turn. You want to look, every turn, for every way that you can eliminate 1 more of his cards than you have to spend doing the eliminating without putting your General at risk. The ‘rock’ to value’s scissors is an aggressive deck that doesn’t care about having resources linger, but rather simply throws them wantonly at your face the moment they hit the board. Because your deck is built to contest the board, a deck plans to beat you even though you have control of the board is your worst nightmare.
Yeah, I’m talking about 90% of Songhai decks, 50% of Magmar decks, and 20%ish of Abyssian decks. Vetruvian and Vanar almost have to play the board-control game, so they tend to be decent matchups for you if you play well.
Speaking of playing well, let’s get away from theory and into how the deck plays out.
Preferred General: Argeon Highmane. The +2 Attack bonus can allow your cheap minions to ‘trade up’ into the opponent’s expensive minions, which is good. More importantly, Suntide Maiden can become a total wrecking ball with 5 attack and the ability to heal herself every turn. Most importantly, Lysian Brawler can become a certifiable win condition with one Roar from Argeon and a Divine Bond — that’s 20 damage to the dome right there.
Mulligans
In almost every game, you want to mulligan first and foremost for a 2-drop or a 3-drop. But if you have some form of board presence to keep yourself from getting aggroed to death, you want to spend your other mulligans looking for value-building tools. In the general sense, your early-game value building tools are Windblade Adept, Silverguard Knight, Void Hunter, Tempest, Suntide Maiden, and Lysian Brawler. More specifically, there are certain cards you want against certain factions:
- Lyonar: Lyonar’s powerful minions and Zeal effect make it very likely that Sun Bloom can get you lots of value.
- Songhai: Songhai’s easy access to fast ranged and dangerous levels of mobility+backstab make Tempest a huge boon, but it’s at least as important to get a 4+ HP minion (to avoid Phoenix Fire) at your back to prevent Backstab shenanigans.
- Vetruvian: Vetruvian’s biggest value generators are Pyromancer and the Obelysks. That makes Tempest, Martyrdom, and Sun Bloom better than your other early-game options.
- Abyssian: Tempest for clearing Wraithling swarms, then Martyrdom or Sun Bloom for runaway Shadow Watchers.
- Magmar: Magmar’s early game largely consists of Young Silithar, Natural Selection, and neutral 2/3s. This makes Windblade Adept, which survives Natural Selection as long as they have a 2-drop down but also trades with that 2-drop without dying, a primary goal, with Silverguard Knight and Suntide Maiden decent backup plans.
- Vanar: Chromatic Cold is a huge setback to this deck, because for the first few turns, everything you do is going to be dispellable. What you want to do vs. Vanar is try to mulligan into Windblade Adepts and Void Hunters so they’ll use their Chromatic Colds on those, and you can then play Suntide Maiden (ideally) or Silverguard Knight without getting immediately dispelled.
Early Game (Turns 1-3)
In the first few turns, you’re going to want to lay down minions with more stats than theirs (Windblade, Silverguard, Suntide) and stay out of the way of their attacks. Don’t attack their general, and try (though it’s all but impossible sometimes) to avoid situations where their general obviously benefits from attacking one of your minions. If they stay at 23+ health, Martyrdom stays a viable play that only gets more valuable as they cast larger and larger cards.
Midgame (Turns 4-6)
As the board develops and their plan becomes evident, start looking at which of your cards can most easily build card advantage against their strategy. Your best bets are often going to be a well-timed Tempest (either when your creatures can survive and theirs will die, or when you can usefully suicide whatever you have so there’s nothing to lose when you Tempest), a Suntide Maiden that can eat a weenie on their side every turn and keep moving, and a Dancing Blades that will finish off a creature of theirs and leave behind a body big enough to be a significant threat.
Late Game (Turns 7+)
If your gameplan works out, by this point, the enemy is running out of resources by now. Playing a Void hunter or Necroseer can often take out a creature of theirs and draw you a new threat; once you can land a threat like Necroseer or Lysian Brawler and it doesn’t immediately die (and not before), drop Stormmetal Golem and bring it to their face for some serious poundage.
Swaps
A few tweaks to the deck that might make it better (or worse) for your particular playstyle — try them and see which you like better:
- Swap out 1 Martyrdom for another Sun Bloom (requires 40 more Spirit)
- Swap out Void Hunters for Blaze Hounds (dangerous, but some people swear by it)
- Swap out Lysian Brawlers for Primus Shieldmasters (less vulnerable to getting killed before it acts, but less likely to take out 2 full cards and incapable of the 8-to-the-face finishing blow.)
- Swap out Necroseers for Brightmoss Golem (more vulnerable to removal, but better at board control, probably about the same in terms of value overall.)
Upgrading
This deck upgrades highly effectively. In order, you want to build toward:
- Void Hunter –> Sojourner
- Rock Pulverizer –> Primus Fist
- Lysian Brawler –> Holy Immolation
- Necroseer –> Twilight Sorcerer
- 2x Stormmetal Golem –> 2x Archon Spellbinder
- Suntide Maiden –> Arclyte Regalia
That’s a long list, but by the time you’re done, you will have a definitively S-rank-worthy deck on your hands. Without the Legendaries, Diamond rank should still be yours with some practice.

The Theory Behind this Deck
Combo decks in Duelyst play a ‘skate by’ game for the first several turns, looking to draw and Replace as many cards as possible as quickly as possible while doing whatever they can to prevent the opponent from building a threatening board. Meanwhile, you’re collecting in your hand a combo that can produce lethal results either instantly, or if the opponent can’t answer a single minion played on the opposite corner of the board.
Songhai offers the opportunity to go for the ‘instant lethal combo’ using Inner Focus, but at the lower ranks it’s generally actually better to rely on the second variation because Inner Focus is so often a dead card if you’re still combo-hunting. You’d rather draw something that you can use to either contest the board or draw more. In this deck, your ‘killer combo’ is [Bloodletter or (less desirable) Scarlet Viper] + [any combination of Killing Edge, Primus Fist, or Saberspine Seal]
Combo can be a highly counter-intuitive style to play, because you feel aggressive — you know you’re going to punch his face in for a ton of damage — but you have to play defense for most of the game. You’re going to want to mostly move away from the enemy, ‘saving face’ as it were, and dropping units behind you to tie them up. If you’re clever with your positioning, you can often convince the enemy General to waste actions and take damage by putting a Void Hunter where only the General can reach it, which is a triple-win for you: you draw, they take face damage, they wasted an action helping you get to your goal. Similarly, cards like Primus Shieldmaster force the enemy to use their actions on their turn to remove your dude, and can often take a few minions either out completely or into Twin Strike/Phoenix Fire range as they burn the enemy’s rope.
That said, every archetype has a weakness, and combo’s weakness is healing. There are few combos in Duelyst which can consistently take an enemy general down from 20+ life, and if they have too many HP for your combo to win with, it doesn’t matter how quickly you drew it. You’re counting on being able to tempt the enemy General into bringing down their own HP removing your minions (or sneaking in a few solid hits on your own turn), and if they refuse and heal up what you’ve already done, your only choice is to bring your game to them — which is mostly a game you’re going to lose.
This makes many Lyonar, some Abyssian, and occasional Magmar decks really annoying, as each has their own efficient healing cards. Emerald Rejuvinator, a solid Neutral Rare, can also mess you up no matter what the enemy is playing.
Preferred General: Kaleos Xaan. The Bloodborn Spell ‘Blink’ moves a friendly minion two spaces, which gives you extraordinary access to the opponent’s backside for Backstabbing via Kaido Assassin or Scarlet Viper, but also allows you to summon a Necroseer and then bump it two spaces even further away from the enemy’s position, making it even harder to kill so you can then Mist Dragon Seal it back to the enemy General’s side for a huge combo finish.
Mulligans: Contrary to what you might think, you don’t want to mulligan for Saberspine Seal, Mist Dragon Seal, Scarlet Viper, or Bloodletter right off the bat, because you can’t use those combo pieces to perform the dual function of slowing the opponent down and drawing more cards. Killing Edge is great only if you have a Kaido Assassin. Other than that, you want to Mulligan for any given 2-drop (going first) or 2-3 drop (going second). If you already have a decent 1st-turn play in hand, dump whatever isn’t Twin Strike, Void Hunter, Primus Shieldmaster, or Phoenix Fire, and look for more of those. In specific matchups:
- Lyonar: Put extra emphasis on finding Phoenix Fire (for dealing with annoying Windblade Adepts and Silverguard Knights), Void Hunter (to tempt out Tempest before you put down a more serious minion), and Repulsor Beast (for moving those damn Ironcliffe Defenders far, far away.)
- Songhai: The mirror match calls for Twin Strike (to finish off Mini-Jax and/or Heartseeker), Rock Pulverizer/Primus Shieldmaster (to stand at your back and keep enemy backstabbers at bay), and Necroseer (to tempt out removal).
- Vetruvian: Ditch everything in the quest for Phoenix Fire (to clear the almost-inevitable first-turn Pyromancer that will make your life miserable if you can’t kill it before it’s buffed) and Repulsor Beast (for moving those Obelysks into the corner where they won’t bother you anymore.)
- Abyssian: Twin Strike isn’t bad here, but Primus Shieldmaster and Rock Pulverizer are your MVPs vs. swarms. If it happens to be Big Abyss, you can generally still make use of them in the early game, and Replace like crazy looking for Scarlet Viper so you can Backstab any offending giant critter from across the board.
- Magmar: Magmar’s combination of big Rush minions and buffs can deal massive damage to the dome really quickly. Your best tools are going to be Twin Strike (for taking out Makantor Warbeasts or Elucidators that are down 2 HP after attacking) and Void Hunter/Necroseer (for taking out their beasties while you draw toward your combo.)
- Vanar: Vanar’s Chromatic Cold can make your combo efforts useless in one stroke by removing the purpose behind Bloodletter/Scarlet Viper, so your goal is to bait them out quickly. Void Hunter is a great way to do that, but because Vanar love to Infiltrate and get cheap bonuses, they hate Provoke enough to blow their dispels on Primus Shieldmaster and occasionally even Rock Pulverizer, so hunt them down, too.
Early Game (Turns 1-3)
The first priorities here are laying down a 2-drop so that you don’t just get flat-out overwhelmed out of the gate, and nibbling away at the enemy’s initial tempo burst with cards that keep your hand full (Twin Strike, Void Hunter, and Killing Strike if you can get it onto a Kaido Assassin.) If none of those are handy, just run forward, drop whatever you can to slow them down, and then retreat.
Midgame (Turns 4-6)
As you get some distance, up your delay game with Primus Shieldmaster, and if you can, drop your first kill unit somewhere that none of the enemy’s minions can reach. In the meantime, keep Replacing looking for combo pieces that you don’t already have, and keep looking for ways to draw and eliminate threats at the same time.
Late Game (Turns 7+)
The second you get a kill-minion down and it survives a turn, hit it with every buff you have, move it to the enemy minion with Mist Dragon Seal (or the Scarlet Viper’s innate Flying), and hit it for as much as you can. Don’t bother saving anything for a second strike or second kill-minion; you might not ever see them. Instead, just pile on as much damage as you can, and if it doesn’t kill them, finish them off with Saberspine Tigers and Phoenix Fires over the next turn or three.
Swaps
This deck has a few cards that could easily be switched out for others in ways that make it weak to different things or effective in different ways.
- Swap out the Healing Mystics and the Saberspine Seals for +1 Necroseer and 3xEphemeral Shroud. (Currently my favorite setup for this deck.)
- Swap out the Rock Pulverizers for Chakri Avatars if you feel like you need to draw out Dispels (or that the people you’re facing just aren’t packing any)
- Swap out the Repulsor Beasts for Thorn Needlers if you feel you need more threats.
- Swap out the Healing Mystics for +1 Saberspine Seal and +1 Scarlet Viper (40 more Spirit.)
Upgrading
This deck’s upgrades aren’t cheap — but they’re powerful.
- Bloodletter –> Dagger Kiri
- Void Hunter –> Sojourner (or Mogwai, your choice)
- Saberspine Seal –> Juxtaposition
- Repulsor Beast –> Gore Horn (You can make one of these for each Juxtaposition you’re using)
- Scarlet Viper –> Spiral Technique
- Necroseer –> Spelljammer (or Aethermaster, your choice, but Spelljammer is probably better)
- Healing Mystic +1 Rock Pulverizer –> Tusk Boar
Fully upgraded, this deck will handily get you to Diamond, possibly S-Rank depending on the meta of the month, with or without the Legendaries (they’re nice, but mostly optional.)
Vetruvian Board Control Pauper

The Theory Behind This Deck
Unlike most other card games, Duelyst is played on a board, which means tactical positioning can and will win and lose games. That means that, unlike in simpler games, there are more than just your basic breakdowns of ‘aggro,’ ‘tempo,’ ‘value,’ and ‘combo’ — there are also decks that sacrifice both power and value in order to play cards that affect the positioning of units. This is seen offensively in the Songhai Combo Pauper, above, with Mist Dragon Seal and Kaleos’ Bloodborn Spell, Blink. This deck uses mass Provokes to achieve the opposite effect, locking the opponent down so your Provokes can absorb the enemy’s removal and damage while you build a huge lead in cards using your wealth of draw power.
You’ll notice that, like the Lyonar Pauper above, the Board Control Vetruvian is also looking to build card advantage — that’s because as much as Board Control is a style of play, it alone can’t win games. If all you do is lock the opponent down and you never build either a tempo advantage or a card advantage, you’re going to end up with the opponent killing you before you kill him, or killing all of your minions and coming after you with a big finisher that you can’t answer.
In this case, all that draw power you have is building toward an endgame that revolves around one of two finishers: either you lock them down, run away, and rain down Flying and Rush minions from afar until they kick it, or you plant a Bloodletter with one or both of Scion’s Second Wish and Cosmic Flesh after they’ve spent their hand trying to deal with your endless line of Provokes. Cosmic Flesh on a Bloodletter they can’t remove is an especially sweet moment, because they really, really don’t want to attack into it, but clearing a 5/9 without hard removal is nigh unto impossible.
The difference between Board Control and a straight Value deck like the Lyonar one above is that the Value deck loses when the opponent brings heavy removal to the game, because it’s counting on getting lots of value from its minions, removing 2+ of the enemies’ minions with 1 of its own. The Board Control deck is actually counting on the enemy bringing removal, and deliberately baiting out that removal with Provokes so that it can freely rain hell down upon you.
You might assume that this means the Board Control deck loses to a minion-heavy, Tempo-oriented deck…and you’d be right! Decks that play high-tempo creatures that can remove your Provokes and live to keep coming are your worst nightmare. Nothing sucks more than to put down a perfectly-placed Primus Shieldmaster and watch your opponent respond with a Primus Fist on his Infiltrated Crystal Cloaker, killing your 4-mana minion for 2 mana and laying down a new threat for you to deal with at the same time.
Preferred General: Zirix Starstrider. Zirix’ Wind Shroud ability gives him the edge in a controlled situation, as he can wear his opponents and minions down from outside of their range by summoning Dervishes and using them to get free hits. If you stand one square away from a target in a straight line, and there are no other obstacles, any summoned Dervish will be able to hit that target — take full advantage!
Mulligans: Much like you expect, your first priority should be to obtain a turn-one play, preferably Rock Pulverizer, but really anything will do. After that, you’re looking for, in order of awesomeness, a Primus Shieldmaster, a Void Hunter, a Blaze Hound, or a Scion’s First Wish to play on your t1 minion. You also want to keep the following cards against the following factions:
- Lyonar: Argeon is one of your worst nightmares; his high-tempo playstyle can really make short work of your efforts to pen him in. To counter, you’re going to want to stay well away and work hard to draw out his resources with your draw-minions, so keep Wind Shrike, Necroseer (only going 2nd), and above all else, Siphon Energy to negate his OP Zeal crap (mostly Silverguard Knight, but also Suntide Maiden and/or Windblade Adept) and/or to get away from an Ironcliffe Defender that’s ready to be Divine Bonded.
- Songhai: Kaleos’ Blink is less annoying than you think, but it’s still annoying; you want an extra Provoke minion at your back if at all possible, so hunt for two. Past that, a Saberspine Tiger can often save you from a punishing (but not Inner Focused) Kaido Assassin and/or Gore Horn. If it’s Reva, look for a Wind Shrike, because you’re going to want something that can get across the board quickly to deal with her Ranged spawns.
- Vetruvian: Your ideal starting hand will contain a Saberspine Tiger and a Scion’s First Wish, so that you can efficiently take out his opening Pyromancer or Obelysk without your kitty dying. Failing that, just remember that Vets have lots of ways of dealing 2 damage, but not that many ways of dealing 3 — so try to Replace your Void Hunters unless you have nothing better to do with the mana.
- Abyssian: Against Lillithe, you want to open with a Rock Pulverizer if at all possible, and hold a Cosmic Flesh as well, for horde-clearing power. (This is especially good on a Wind Shrike or Young Flamewing as they can’t be dealt with using Daemonic Lure.) Against Cass, you’re gonna need math — use your buffs carefully to keep your minions away from the 1-HP mark so that you can minimize the damage her nasty Bloodborn Spell can do over the long game.
- Magmar: You’re not going to be able to Board Control a decent Magmar; there’s just too much Rush/Frenzy going on. Fortunately, their early game is fairly weak — take advantage by swinging for the face right out of the gate with whatever early drop you have. Past that, look for Void Hunters and Blaze Hounds to throw up as a defensive wall while you drop Flyers outside of his Rush range, buff the crap out of them, and throw them at his face.
- Vanar: You need to lure out Vanar’s signature removal (Chromatic Cold, Cryogenesis, and Hailstone Prison) before you invest too much in buffs. First Wish is fine because it replaces itself, but against Vanar you really want to land Rock Pulverizer and Primus Shieldmaster early so Mulligan for them, and pray that you can convince them to blow a Chromatic on Void Hunter. Once you’ve seen a few removals, you can start planting buffs, but try to avoid keeping Second Wish and Cosmic Flesh in your opening hand.
Early Game (Turns 1-3)
Don’t hesitate to put down a Primus Fist with no targets on turn 1 if it means you have something on the board. If not, in general, lead with your draw minions (Void Hunter, Blaze Hound), and buff them with First Wish if you have a spare mana. If you get the chance, drop Primus Shieldmaster in their face or Shrike/Dragon away from them., to be buffed and thrown into the mix next turn.
Midgame (Turns 4-6)
Use your Provokes (natural and Cosmic Fleshed) to hamper the enemy’s plans, and make ample use of your powerful Bloodborn Spell to help your Provokes finish off the minions they have locked down. Don’t buff your Wind Shrikes though, because they vanish at the end of the turn (again, First Wish is acceptable if it allows you to get a big advantage.)
Late Game (Turns 7+)
When you reach the 9-mana stage, you need to make an important decision: can you afford to leave your General close enough to the fight to take advantage of your 2-damage Bloodborn Spell every turn? Or do you have to back off a bit and use Provokes and Flying to keep them at bay but still taking damage? Ultimately, your goal is to land a Bloodletter with Cosmic Flesh or Scion’s Second Wish and get it up to their face to deliver their final punishment, but it’s often just as easy to win by putting Second Wish on a Young Dragon or Wind Shrike and fly it to whatever side of their General is away from most of their minions so it can beat face.
Swaps
The swaps you can make in this deck are largely ones that sacrifice a bit of the draw-heavy nature in order to keep up more strongly on the board.
- Swap out Blaze Hounds for Sand Burrowers to gain a lot of value over time and keep an effect somewhat similar to draw.
- Swap out the Void Hunters for Wings of Paradise for more scary Flying beatdown (that will also encourage you to Replace every turn, which is good.)
- Swap out the Necroseers for Brightmoss Golems for some great, hard-to-kill board presence that can take powerful advantage of your Cosmic Flesh.
- Swap out a single Blaze Hound for one more Siphon Energy if you need more Dispel to keep up with enemy buffs.
Upgrades
This deck’s upgrades slowly morph it away from focus on Flying and excessive drawing and toward an even more value-heavy approach.
- 2x Bloodletter –> 2x Dagger Kiri
- Wind Shrike –> Dancing Blades
- Blaze Hound –> Sojourner (excellent with Second Wish!)
- 2x Young Flamewing –> 2x Dominate Will
- 1x Primus Fist and 1x Scion’s Second Wish –> 2x Rasha’s Curse
- (Optionally, at this point, replace Void Hunter –> Dunecaster)
- Necroseer –> Golden Justicar or Sworn Defender (Note Golden Justicar + Cosmic Flesh!)
- Void Hunter/Dunecaster –> Spelljammer
- 2x Dagger Kiri –> 2x Aymara Healer (Yep, a 2nd upgrade.)
Once this long list of expensive upgrades is complete, you’ll have a killer late-game Vet on your hands that will be able to carry you easily to Diamond, possibly even S-Rank with practice and depending on the meta.
…And that’s all for now, guys! You can expect it to take me a couple more weeks of testing and writing-up to get pauper decks for the other three factions. Hopefully, by then, most of you will be past the Pauper stage and waiting anxiously for the Ultrabudget decks that are coming after that. 🙂 Until then, keep on Duelying!

Great to see you back writing again. Your other stuff was immensely helpful when I first started playing.
LikeLiked by 1 person
I’ve just started duelyst and these decks are absolutely awesome, thanks very much!
My only criticism is the decklists are a little difficult to read against the white background, especially to someone who isn’t familiar with the cards.
Thanks again, looking forward to your decklists for Magmar, Vanar & Abyssian.
LikeLike
Fixed, thanks for the critique! 🙂
LikeLike
No worries, the new background is much better!
LikeLike
I wanted to ask about upgrading the lionar deck. When it says, for example: “Void Hunter –> Sojourner” does that mean that i am supposed to swap out 3 of my void hunters for soujourners or to swap one of them and leave 2 void hunters in my deck?
Best regards, Thomas
LikeLike
All swaps are intended to mean all three copies unless otherwise specified. But feel free to swap one at a time as you get the Spirit to craft the next card. 🙂
LikeLike
Thanks a lot for the answer, that was bothering me for a while and i was doubting if i am doing the right thing. Using the opportunity, could you tell me how to counter/do better against those pesky shadow creep abyssian decks? I face them like 90% of the time and i also lose 90% of these games no matter what. I only use lionar though, i don’t have cards for the others.
LikeLike
Creep Abyssian is hard as a dedicated Lyonar player because it requires you to do something counterintuitive to Lyonar: keep your big minions away from your General, starting the moment Cassyva is going to get access to 7 mana. That said, if you can arrange the board so that you have at least one decent threat that isn’t adjacent to your General, the Abyssian has to decide whether to go for the face (put the Creep under you) or to play defense (put it under your threat.) Yeah, this makes Suntide Maiden a lot less powerful.
Another tool you can use to really put the cap on Shadow Nova is Sun Bloom — it’s well worth it to Bloom away a 2×2 Shadow Creep even if you don’t catch anything else with the Bloom.
Really, though, the biggest trick you can use against Cassyva is to prevent her from building up random one-off Creeps over the course of the game. That means taking pains to not leave a minion at 1 HP (or 1+the attack of her nearest minion HP), and to take out Abyssal Leviathans in one hit (or with a spell so they don’t spawn any tiles.)
Alternately, just go full-face blitz aggro. Killing her with a Roar+Divine Bond+Lysian Brawler before she reaches 7 mana is a perfectly legitimate option. 😀
LikeLike
So, great guide! I do have a question, can we make upgrades in the wrong order and/or only partially? Like, I have one Arclyte Regalia, would it make sense to replace one Suntide Maiden, but keep the other 2?
LikeLike
If you have a card, absolutely use it to upgrade! Unless there’s a special note in the order of upgrades, they can be done however you’re able — I just generally put them in order of ‘cheapest first.’ 🙂
LikeLike
Hey, um, Divine Bond isn’t in the Lyonar deck, so doesn’t that change some of the other choices like maybe Lysian Brawler and/or Argeon himself?
LikeLike
D’oh! Obviously I went through a few iterations as I was writing these. XD Honestly, though, other than possibly invoking the Lysian Brawler Primus Shieldmaster swap, I don’t think I’d change much. Even without Divine Bond, the deck plays much more effectively with Argeon than Zir’an, and Argeon + Lysian Brawler is still 10 to the dome from one creature and a BBS — not inconsiderable!
LikeLike
FIrst off, love these pauper guides. So many useless decklists out there with like 12 legendaries and it’s like, yeah, If I had played enough to get 12 legendaries I wouldn’t be needed to consult you for decklist advice, would I? 😛
Been Loving the Songhai and Lionar Decks; very cohesive, winnable strategies with really cheap cards. Songhai in particular feels really nasty and like I pull off wins against a lot of decks that I shouldn’t. wanted to drop my 2c here though:
definitely try this list (or one like it) with Reva. Most players consider all ranged minions KOS, and I often can even bait people into using hard removal tools to clear them out. plus, If I draw surplus killing edges a 5/3 rangd unit out of nowhere is a brutal threat on the table.
Kaleos’s BBS was coming in handy to land the finisher <1/10 games I found (mist dragon seal makes it trivial). granted, in those few games it was positively clutch but overall I'm having a much easier time stalling and kiting with reva's heartseekers pestering Maybe this is just a symptom of my very low rank, but in general I've been finding the teleport pretty lackluster.
LikeLike